Friday, 23 June 2017

Mermaid For Each Other - MFTWSC338

Hello my friends and welcome back.  It's the first week of summer and the weather has been beautiful lately!

I finally made another card.  This time using the sketch from MFT Card Challenges.


Instead of using the heart on my card, I used a mermaid and fish from the Birdie Brown - Mermazing stamp set from MFT Stamps.

I created the background by using the Radiating Rays stencil from MFT Stamps and Broken China and Cracked Pistachio Distress Oxide inks.  I first taped the white card stock panel down to a board, so it wouldn't move, then I laid the stencil over the panel and taped that to the board as well.  I inked up the top half of the panel with Broken China, using an ink blending tool, and the bottom half of the panel with Cracked Pistachio.  I then lifted up the stencil and inked over the remaining white portion, lightly with both inks.  I then generously sprayed the back of the stencil with water and placed it back down on to the inked panel, which gave the background a more distressed and scattered look.

I coloured the mermaid and fish with Copic markers and added them to the front of the card and added a few drops of the Morning Dew Crystal Drops from Nuvo as the finishing touch.

Here is the finished card.


Below is a list of the supplies I used.

Stamps: MFT Stamps - Birdie Brown - Mermazing
Dies: MFT Stamps - Blueprints 20 and Blueprints 27
Inks: Simon Says Stamp - Intense Black,  Versafine - Onyx Black,  Distress Oxide - Broken China and Cracked Pistachio
Copic Markers: Mermaid - Skin-E11, E33, V15, R22  Hair - E21, E25, E27  Tail - V12, V15, V17  Top - BG11, BG13, BG57  Star - Y06, Y38   Fish - C1, C3, C5, Y06, Y38
Other: Recollections - 110lb White card stock,  MFT Stamps - Radiating Rays Stencil,  Nuvo - Morning Dew Crystal Drops

Thank you so much for taking the time to drop by.  I hope you have a wonderful day! Kathy

Friday, 16 June 2017

You Are Jawsome

Hello my friends, I hope you are doing well.  For the last week or so, I have been a crafty slump.  I love seeing what people are making but had absolutely no energy/desire to make anything myself.  I think I became discouraged when the day after I made a paper rosette wreath for my front door the matched a lantern I decorated, the lantern was stolen.  I can't believe that such a thing would happen.

Although I don't think I'm totally over my slump, I did manage to make a card using the new Duh-Nuh stamp set from Lawn Fawn which I combined with their Mermaid For You set as well as the Beach Scene Builder die-namics from MFT Stamps.

The shark, rock and mermaid were all coloured with Copic markers and the ocean, sand, sky and palm tree were all coloured using Distress inks on white card stock.

Here are a couple of pictures of the finished card.


Below is a list of the supplies I used.

Stamps: Lawn Fawn - Duh-Nuh, Mermaid For You
Dies: MFT Stamps - Beach Scene Builder,  Lawn Fawn - Ocean Wave Accents,  Puffy Cloud Borders (For cloud stencil)
Inks: Simon Says Stamp - Intense Black,  Versafine - Onyx Black,  Distress Inks - Tumbled Glass - Sky,  Salty Ocean, Peacock Feathers and Blueprint Sketch - Ocean,  Gathered Twigs - Sand, Tree Trunk and Coconuts,  Twisted Citron and Mowed Lawn - Palm Fronds
Copic Markers:  Shark & Rock - C00, C1, C3, C5  Mermaid - E11, E33, R22, V12, V15, V17, R02, R05, R08, BG11, BG13, BG57
Other: Recollections - 110lb White card stock

Thank you so much for dropping by and I hope you have a wonderful day.  I hope to be make soon with another project/card.

Kathy

Monday, 5 June 2017

Summer Welcome Wreath

Hello my friends and welcome to the first full week of June.

I really wanted something for my front door but didn't want to spend much money.  I was looking at Pinterest for ideas and saw some patriotic rosette wreaths that I really liked.  For my wreath I wanted to make it more versatile, so I can keep it up all summer.  I used paper that matched the little Welcome Banner I made for my lantern that is on my front porch.

Here is the finished wreath.


The first thing I did was make my own wreath form by tracing a pizza pan and then a dinner plate onto a piece of cardboard.  I cut out the ring using a combination of a box cutter and scissors.


I then made a bunch of rosettes using the Dear Jane 12 x 12 paper stack from DCWV.  I cut 12 inch strips into widths ranging from 1 1/2 inches to 3 inches wide and scored the strips every 1/2 inch.  I then accordion folded the strips and glued two 12 inch strips together and pressed them down, into hot glue, on card stock circles.  I arranged some rosettes on the form to get an idea of how many rosettes I needed.


For the next step I created a Welcome Banner using the Pennants dies from Little B and High-Rise Alpha Uppercase dies from MFT Stamps and glued then onto a length of natural hemp cord.  I used the largest flower centre die from the Plentiful Petals dies from MFT Stamps to make the centres of the rosettes.  I then used hot glue to attach the rosettes and banner to the wreath form.


Below is a list of the supplies I used.

Dies: Little B - Pennants,  MFT Stamps - High-Rise Alpha Uppercase and Plentiful Petals
Design Paper:  DCMV - 12 x 12 Dear Jane paper stack
Other: Recollections - 65lb Coral and Green card stock, Black & Gold Halloween 6x6 paper pad,  Hemptique - Natural 20lb Hemp cord,  Cream Grosgrain ribbon,  Cardboard

Thank you so much for taking to time to drop by.  I hope you have a wonderful day! Kathy

Saturday, 3 June 2017

Dance Through Life

Hello my friends and welcome.  I hope you are having a good weekend so far.

Very recently I saw a card on the Sunny Studio Stamps Blog, made by Karin Akesdotter, where she created a pirate scene in a "polaroid" frame and it inspired me to make my own "polaroid" scene.

I looked through my stamp sets and found the adorable Trouble In A Tutu stamp set from Clearly Besotted that I had never used before.

The first thing I did was cut a piece of heavyweight card stock with the Say Cheese die from Lawn Fawn.  I then took the inside of the polaroid frame and stamped three of the cute ballerina hippos which I coloured with Copic markers.  I added a woodgrain floor, backdrop and curtains using Copic markers.  I cut a piece of blush pink card stock with the largest die from the Blueprints 13 die-namics from MFT Stamps and attached it to the A2 card base.  I then added a sentiment to the bottom of the frame and attached the "polaroid" to the card base.  As a finishing touch I added a few sequins and the card was done.

I love how the little scene turned out.


Below is a list of the supplies I used.

Stamps: Clearly Besotted - Trouble In A Tutu
Dies: Lawn Fawn - Say Cheese,  MFT Stamps - Blueprints 13
Inks: Simon Says Stamp - Intense Black,  Versafine - Onyx Black
Copic Markers:  Hippos - W00, W1, W3, R20  Hippos' Clothes - R81, RV55  Floor - E31, E34, E35  Backdrop - B21, B23, B24, B26  Curtains - RV66, RV69, R89
Other: Recollections - 110lb White and Pink card stock,  Pretty Pink Posh - 4mm Sparkling Clear Sequins,  Neat and Tangled - Pink Lemonade Sequin Mix

Thank you so much for taking the time to drop by.  I hope you have a wonderful day! Kathy

Thursday, 1 June 2017

Mermaids

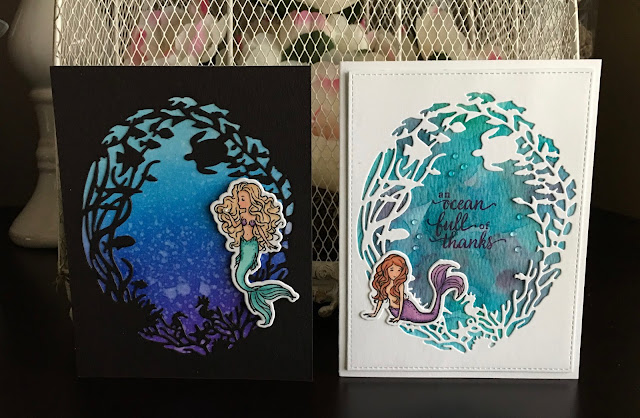
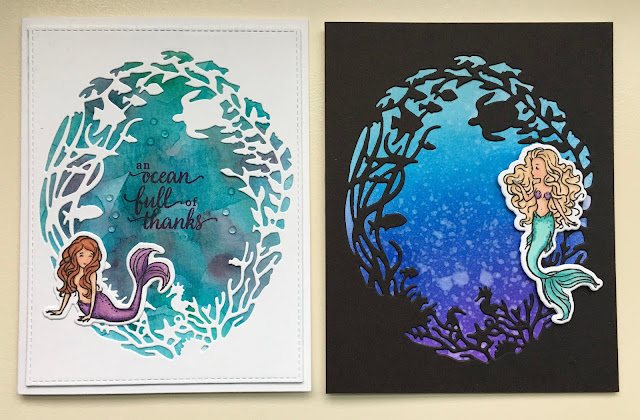
Welcome back my friends!  Today I have a couple of cards using the May 2017 My Monthly Hero Kit from Hero Arts.


For the first background I used the turquoise silk liquid ink, which was included in the kit, along with Frozen Lake Glimmer Mist from Tattered Angels and Open Arms Amethyst Starburst Spray from Lindys Stamp Gang.

I cut a white card stock panel with the largest die from the Blueprints 13 die-namics from MFT Stamps and then used the Reef Border and Frames Fancy Dies from Hero Arts to cut the design in the panel.  I glued the white card stock to the background panel and then stamped the sentiment in Grape Jelly shadow ink from Hero Arts.  I added a Copic coloured mermaid and a few drops of Morning Dew Crystal Drops from Nuvo.


For the second background, I used distress inks to create an ombre background, directly to the card base.  I then sprayed the background with water and then blotted it with paper towel to add some texture.

I again used the Reef Border and Frame Fancy Dies from Hero Arts to cut the design in a piece of black card stock and glued it onto the card base.  I popped up a mermaid, which I coloured with Copic markers, with foam tape onto the card front.  I love how the black looks over the ombre background.


Below is a list of the supplies I used.

Stamps: Hero Arts - May 2017 My Monthly Hero Kit
Dies: Hero Arts - May 2017 My Monthly Hero Kit and Reef Border and Frame Fancy Dies,  MFT Stamps - Blueprints 13
Inks: Simon Says Stamp - Intense Black,  Hero Arts - Grape Juice,  Distress Inks - Tumbled Glass, Salty Ocean, Blueprint Sketch and Wilted Violet
Copic Markers:  Skin - E11, E33, R20  Hair - E08, E13, E15, E50, E53, E55  Purple - V12, V15, V17  Aqua - BG11, BG13, BG57
Other: Recollections - 110lb White and Black card stock,  Turquoise Silk Liquid Ink,  Tattered Angels - Frozen Lake,  Lindys Stamp Gang - Open Arms Amethyst,  Nuvo - Morning Dew Crystal Drops,  Spectrum Noir - Crystal Clear Sparkle Brush Pen,  Foam Tape,  Flatback Pearls

Thank you so much for dropping by.  I hope you have a wonderful day! Kathy